Files
Loading a state file
State files are plain UTF-8 text with named sections. You can include only the sections you need.
# 800 steps, 19 data registers (R00–R19) — "2 OP 17"
PARTITION: 799.19
# Magnetic card with one Label
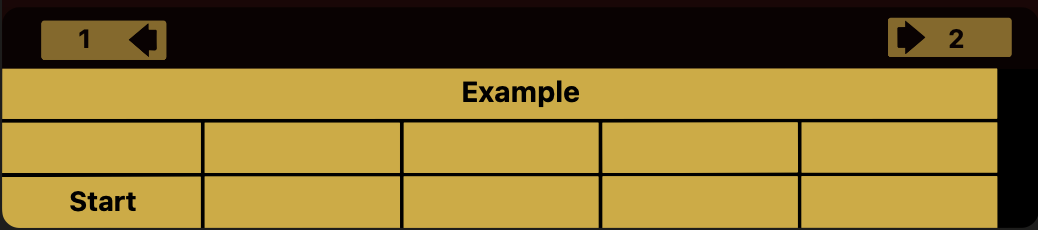
CUECARD:
Template: MagnetCard
Title: Example
Banks: 1,2
A: Start
# Load the Master Library
SOLID-STATE-MODULE: ML
# Force Printer On
PRINTER: on
# Program Listing
PROGRAM:
001  76  LBL
002  11. A
003  89  π
004  95  =
005  91  R/S
# Data Registers
REGISTERS:
00 = 3.141592653589793   # π  (verify RCL 00 → 3.141592654)
# Type some keys after load / reset
KEYSTROKES:
84   3
11   A
Wait: 2s
43   RCL
92   0
92   0
PARTITION: sets the step split between program memory and data registers.
PROGRAM: accepts sparse step listings, numeric keycodes, and the ... gap marker.
REGISTERS: stores calculator variables as decimal numbers.
KEYSTROKES: injects matrix codes after the file loads. Wait lines are allowed between groups.
CUECARD: defines the on-screen cue card that appears with the loaded file or module.
SOLID-STATE-MODULE: and PRINTER: let a file select the matching module and printer state automatically.
This page covers enough to load and tweak existing files. The complete grammar — matrix code table, 2nd-function presses, the CUECARD field list, and the math-notation shorthand used in cue cards — is developer documentation kept in the GitHub repository: reference/StateFileFormat.md →
Labeling the A–E and A′–E′ keys
The five plain keys (A–E) and their 2nd-function row (A′–E′) are exactly what real TI-59/58/58C cards label. A CUECARD: section can do the same thing on-screen — either as its own row of short per-key labels, or as one line of running text across the whole row.
Template picks the background art and layout, and matches the real card it stands in for. On the real hardware, magnetic cards have a writable label area on the front and a magnetic coating on the back for the program; use MagnetCard if the state file is meant to end up written onto one (it also shows the Banks page badges). The TI-58 and TI-58C have no card reader, so their owners documented manually re-entered programs on cards with the same kind of writable front but no magnetic back — use CueCard for that case, or for any file that just wants an on-screen label without card art. Which of the two you pick for a given state file is mostly personal preference, except when the file is a step toward an actual magnetic card — then use MagnetCard to match. SolidStateCard reproduces the pre-printed cards that shipped with a Solid State Software module; real ones can't be edited by the module's user, and in the emulator they're normally only touched by the project's developer to document a built-in module — reach for it yourself only if you're prototyping your own module (it shows an ID like ML-01 instead of Banks).
Set fields A through E for the plain-key row, and A′ through E′ (a straight apostrophe also works: A') for the 2nd-function row. Leaving Row1 or Row2 out entirely is what makes that row show the label grid instead of a line of text — if you fill in Row1/Row2, the individual A–E labels for that row are not shown.
Row1 replaces the A′–E′ grid with one line of running text, and Row2 does the same for the A–E grid. Row2R is a second piece of text placed on the same line as Row2, right-aligned against it — handy for something like a page number or units note that shouldn't compete with the main label for space. Each of the three has its own alignment field — Row1Align, Row2Align, Row2RAlign — set to left (the default), center, or right. Style is none by default, or button to draw a border around the Row1/Row2/Row2R text, mimicking the boxed instruction labels real cards use.
CUECARD:
Template: MagnetCard
Title: Roots & Powers
Banks: 1, 2
A: \sqrt x
B: x^{2}
C: 1/x
D: x \to y
E: \blank
A': \sum x_{i}
B': \xbar
C': n
D': \blank
E': \blank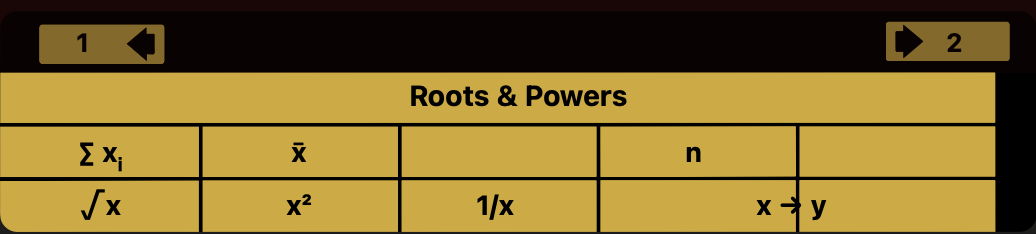
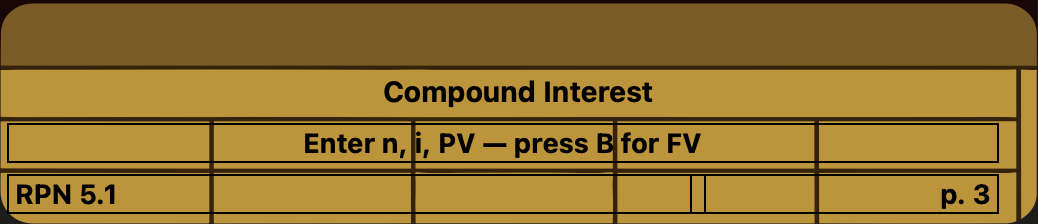
CUECARD:
Template: CueCard
Title: Compound Interest
Row1: Enter n, i, PV — press B for FV
Row1Align: center
Row2: RPN 5.1
Row2R: p. 3
Row2Align: left
Row2RAlign: right
Style: button
A short set of LaTeX-style shortcuts expand to the Unicode symbols real TI-59 cards use in labels, so you don't need a Unicode picker — for example \to becomes an arrow, \sqrt becomes a root sign, \sum becomes Σ, and x^{2} becomes x². The full token table is in reference/StateFileFormat.md.
To make one label visually span more than one key position, set the following cell(s) to \blank — for example D: \blank right after a filled-in C merges D into C's column so the C label reads across both keys.
Loading a labeled card
From a state file — Load State File on a .ti59/.ti58/.ti58c file with a CUECARD section; it's applied immediately and stays until you load something else or reset.
Onto a virtual magnetic card — load a state file with the CUECARD you want active, then Write Magnetic Card: whatever cue card is on screen at that moment is saved into the card file along with the program or data. Reading that card back with Read Magnetic Card restores the label along with the contents.
By editing the card file directly — virtual card files are plain text too (see the FAQ entry on where they live), with the same CUECARD: syntax as a state file. Add or edit that section in a text editor and the label shows the next time the card is read.